


A microscope reveals an exciting and strange world that includes diatoms, radiolarians, crystals, ciliates, tardigrades, rotifers, amoeba, bacteria, pollen, and a wide variety of animal and plant cells. Microscopes are important in research, industry and education and scientists communicate their discoveries in research papers supported with photomicrographs. Hobbyists like to share their observations with their friends and family on social media, forums and anyone that is not fortunate enough to own a microscope. Taking pictures through a microscope is easier than ever and in this article I describe some methods to use digital cameras to take pictures with a microscope.
Dedicated Microscope Cameras
Microscope companies like Motic make dedicated digital cameras for photomicrography that capture photos and movies. Software that comes with these cameras may also enable a person to make measurements from the photos, add scale bars, or modify the image before taking the picture. These cameras are usually tethered to a computer by a universal serial bus (USB) cord which can control the shutter and permits viewing the images seen through the microscope on the computer monitor. The images can also be projected onto a large screen with an LCD (liquid crystal display) projector for teaching or presentations.

Dedicated cameras for photomicrography attach to a C-mount of a microscope usually positioned on the trinocular head or they can be attached to a special eyepiece that can be inserted into any monocular, binocular or trinocular tube. A C-mount is a type of lens mount found on 16 mm movie cameras and microscope phototubes. C-mount lenses provide a male thread which mates with a female thread on the camera. With the addition of special adapters these cameras and associated eyepieces fit into wider stereo microscope ocular tubes. C-mount cameras may come with eyepieces (1X, 0.5X, or 0.41X). Lower magnification eyepieces illuminate more of the sensor area. With a 1X eyepiece sometimes less than 50% of the sensor is illuminated compared to what you see through the microscope eyepiece. If the magnification of the C mount eyepiece is too low however you will see a vignette around the edge of the screen. Dedicated digital cameras will generally cost more for less resolution than a DSLR, but they may allow more precise control and come with specialized software for image analysis.

The image quality is suitable for the internet, quality control inspections or anywhere where small images are acceptable. A 3MP camera is limited to making prints about 8 x 10 inches in size.
The majority of sensors used in dedicated microscope cameras are small and similar in size to those found in cell phones. Dedicated cameras for photomicrography offer between 1 to 20 MP – in general more megapixels is better. Some dedicated microscope cameras come with a larger 1 inch size sensor and 20 MP costing $800 or more and allow enlargements 10 x 15 inches or larger.
In general cameras with larger sensors tend to produce higher quality images with lower digital noise. Some of the dedicated cameras provide black and white images and some are specialized and use cooled sensors to reduce digital noise common in low light microscopy (e.g. polarization and fluorescence microscopy). Dedicated microscope cameras also have silent shutters that cause virtually no vibration during exposure.

The small size and weight of dedicated cameras and an attached eyepiece means they can be inserted into any binocular or monocular tube without putting any strain on the microscope which is an advantage if the microscope does not have a trinocular head.
Another advantage of dedicated microscope cameras is that a computer used in combination with software permits modifications to the digital image before taking a picture. Software associated with some of these cameras can also facilitate pre and post processing as well as the ability to quantify data in the images.
Most dedicated microscope cameras save their images as .jpg, or .tif files. A few cameras may use proprietary image file formats that require the manufacturer’s software for viewing and analysis. These cameras also require a computer in most instances to take pictures though some have an exposure button on the camera and can store digital images onto an SD (secure digital) memory card.
Disadvantages of dedicated cameras are that they use small sensors (most are less than one inch), and many have a low number of megapixels (10 MP or less) which limits the amount of fine detail that can be seen and the amount of enlargement possible. Scientists rarely need images larger than 8 x 10 inches for publication and for this reason dedicated cameras for photomicrography are widely used in research.
Cell Phones, Tablets and Compact Cameras using Afocal Photography
Cell phone cameras can be used to take photomicrographs even by young children. Cell phones, tablets and compact digital cameras can be used to take pictures using the afocal photography technique. The afocal method involves holding the lens of a cell phone, tablet or digital camera up to the eyepiece to take a picture. It’s simple, but getting good results by hand holding the camera isn’t easy.

Cell Phones are capable of capturing images with a microscope that are satisfactory for educational purposes or where low resolution images are required.
A typical cell phone, also called a smart phone, comes with a front and rear camera. The rear camera is higher in resolution and can offer 8 to 12 megapixels in many smart phones. However, cell phones do not exceed the quality of DSLRs (DSC team June 18, 2020) or dedicated microscope cameras. The number of megapixels influences the resolution of the camera, but the size of the pixels and sensor is also important. Larger pixels can gather more light and show less digital noise. Larger sensors may have larger pixels and produce higher quality images with a larger dynamic range. The small size of the sensors in most smartphones limits the quality of images they provide and the size of prints that can be made from them.

Basswood section 200X using bright field microscopy and photographed with a Google pixel 3 smartphone zoomed in. A shows the picture straight from the smartphone B shows the right half of the image after white balance correction in Photoshop.
A universal cell phone adapter allows the attachment of a cell phone to a microscope, telescope, or even binoculars. This model is available on Amazon for $40 and fits a variety of different sized eyepieces.
The main advantage of using cell phone cameras for photomicrography is their world-wide popularity and low price. Cell phones are easy to use and the images taken can be quickly emailed to friends and associates. Cell phone cameras are good in educational environments or in resource-poor regions for telemedicine where images need to be transmitted elsewhere for diagnosis (T. Jones 2016). Cell phone technology and associated software is advancing rapidly and these cameras are becoming valuable for mobile microscopy. Cell phone cameras can even be used with super resolution microscopy (Diederich et. al. 2019) and quantitative imaging (Skandrajah et. al. 2014). The potential for cell phone cameras in photomicrography is unlimited, but at the present time dedicated cameras and DSLRs produce better quality images.
Consumer DSLR Cameras for Photomicrography
The first consumer digital cameras used CCD (charged coupled device) sensors and a few years later camera manufacturers switched to CMOS (Complementary metal–oxide–semiconductor) sensors which offered higher resolution, lower digital noise, ability to use high ISO (international standards organization) settings and required less power. Currently DSLR cameras offer between 12-50 Megapixel sensors that exceed the resolution of 35 mm film several fold - 35 mm film is equivalent to about an 8 MP camera. Even an entry level DSLR camera is capable of capturing high resolution images and can capture high definition (HD) video 2K (1920 x 1080 pixels) or 4K (4096 x 2160 pixels). High resolution still images can also be extracted from video using Photoshop or other image editing software.
A DSLR camera can be used alone or controlled and connected to a computer. The computer can control the camera’s exposure, white balance, perform time-lapse and display the image in real time on screen. Software programs are available to control DSLR cameras from the computer. My favorite program is Digicam Control for the PC which is free.
Depending on the camera model you purchase some DSLR cameras can be heavy and therefore should only be attached to a trinocular or monocular tube as opposed to a binocular tube. The popularity of DSLRs cameras means that their price-performance ratio is high and it is easy to find adapters for the major camera brands to fit most microscopes.
Coupling a DSLR to a microscope
Aside from dedicated microscope cameras, the next most popular method to take photomicrographs involves attaching a DSLR camera directly to the microscope via a trinocular port. To attach a DSLR you will need adapters to attach your camera to the microscope. These adapters can cost as little as $20 to $140 or they can exceed a thousand dollars for custom made adapters. The cheaper adapters are the simplest solution and they work reasonably well except for some vignetting. Vignetting around the edges of the image can be cropped during post processing. Better results can be achieved using a camera adapter that includes an eyepiece that illuminates the sensor.
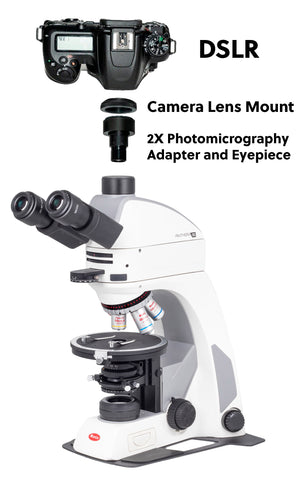
Attaching a DSLR camera to a Motic trinocular microscope with a Motic DSLR adapter. These cost about $200 and work in the same way but does not use an eyepiece. The Camera lens mount (T-adapter) permits attachment of different brands of DSLR cameras.
The highest quality images are achieved with a DSLR camera and photo tube designed for the specific microscope combined with a projection eyepiece for photomicrography. The eyepiece may require an adapter tube to hold it in the correct position. The tubes and accessories vary in cost from a few hundred to over a thousand dollars. Contact the manufacturer of your microscope to see if they offer a method to attach your DSLR camera. This will ensure you will get optimum results. If you own an older microscope, you can sometimes substitute other manufacturer’s photo tubes, but it will require experimentation.
Under ideal conditions the view through the camera and binocular eyepieces should be parfocal (both the view through the camera and binocular eyepieces should be in focus or close to focus). In my experience it’s not always possible to achieve this if you are using equipment from different companies. The photo eyepieces used are usually 2.5X and 5X in magnification – I recommend owning both. Some photo eyepieces are designed to be used with certain objectives to correct chromatic and spherical aberration.
Newer microscopes using infinity optics have these optical corrections incorporated in the objectives and the eyepiece design becomes less important. In the absence of a photo eyepiece, a normal eyepiece will work, but best results are usually achieved using eyepieces specifically designed for photomicrography. As far as the image is concerned from a finite or infinity microscope the quality is similar if using similar quality optics.

Once a DSLR camera is attached to the microscope other factors become important in determining the image quality: brightness of your light source, coverslip thickness, triggering the shutter electronically and the unique properties of your subject. Small things matter for example I use 1\4 inch rubber underlay from the hard ware store (rubber floor matting for gyms) under each microscope to dampen vibrations. Also it is important to adjust lighting on the microscopes so it is even across the field.
Kohler illumination produces the best lighting with a tungsten light source (see Motic Video on how to set up Kohler illumination). It is important to use the correct thickness of coverslip (usually No 1.5 which are 0.17 mm thick) especially using 40X and 60X objectives. If you can’t trigger the camera electronically use a cable release or the self-timer on the camera. Use the lowest ISO speed setting while maintaining a shutter speed of 1\125 sec or faster. Alternatively for fluorescence microscopy you can use exposures of one second or more as most camera vibrations occur around 1\8 of second exposure.
In summary I have described different solutions to connect a camera to a microscope for photomicrography each has its advantages and disadvantages which one is best depends on your budget, the quality and size of images your require and what equipment you might already own. One thing is certain - taking pictures through a microscope has never been easier.
References
Feel free to reach out with our contact form here or chat with us directly if you have any immediate questions on our products and their applications.
A very well written, informative, comprehensive and illustrated article.